Embedding the STOP-IT Stop Signal Task into Qualtrics
Let's embed the Stop Signal Task by Verbruggen et al., 2019, the jsPsych_version into Qualtrics. You can first try the task by clicking HERE.
I adapted the original scripts to make the task work in Qualtrics and put these into my STOP-IT repository. So, it'd be easier for you to fork my STOP-IT repository and start from there.
This version of the Stop Signal Task needs to save the trial-by-trial data for analysis, so I'm saving the data file to a PHP web server, following the Saving Data with PHP. Verbruggen et al. (2019) also provided the analysis script, so please have a look.
This tutorial consists of two parts. (1) I will first explain how you can embed the Stop Signal Task in Qualtrics. (2) I will then explain the changes I made to the original experiment code.
Embedding the STOP-IT Stop Signal Task into Qualtrics
Hosting the STOP-IT scripts in GitHub
To use jsPsych in Qualtrics, the jsPsych javascript and CSS files need to be online and loadable from Qualtrics. Creating a GitHub repository for your experiment helps you do so in simple steps.
- Go to the my STOP-IT repository.
- Follow the Hosting jsPsych tutorial to fork it to your GitHub repository and make the scripts available online.
When you are done, you can check the online files with your browser by directly going to the jspsych.js, jspsych.css, jspsych-html-keyboard-response.js, and stop-it_main.js.
- jspsych.js should be available at
https://<your-github-username>.github.io/STOP-IT/jsPsych_version/js/jspsych-6.0.5/jspsych.js, like https://kywch.github.io/STOP-IT/jsPsych_version/js/jspsych-6.0.5/jspsych.js. - jspsych.css should be available at
https://<your-github-username>.github.io/STOP-IT/jsPsych_version/js/jspsych-6.0.5/css/jspsych.css, like https://kywch.github.io/STOP-IT/jsPsych_version/js/jspsych-6.0.5/css/jspsych.css. - jspsych-html-keyboard-response.js should be available at
https://<your-github-username>.github.io/STOP-IT/jsPsych_version/js/jspsych-6.0.5/plugins/jspsych-html-keyboard-response.js, like https://kywch.github.io/STOP-IT/jsPsych_version/js/jspsych-6.0.5/plugins/jspsych-html-keyboard-response.js. - stop-it_main.js should be available at
https://<your-github-username>.github.io/STOP-IT/jsPsych_version/stop-it_main.js, like https://kywch.github.io/STOP-IT/jsPsych_version/stop-it_main.js.
Preparing the Dropbox to save your files
To analyze the Stop Signal Task data, you need the trial-by-trial data file, which you can get these by using a web server and PHP. Please read it and prepare a url for save. Once you have the url, find the line var save_url = "<PUT YOUR SAVE URL HERE>"; in experiment-transformed-qualtrics.js and replace <PUT YOUR SAVE URL HERE> with the url.
For the save function to work properly, it must start with https://.
Embedding the task to Qualtrics
Let's log in to Qualtrics and take a look at each step.
Step 1. Create a new Qualtrics project and then a new question
First, create a new Qualtrics project. Then, create a new question and (1) change its format to Text/Graphic.
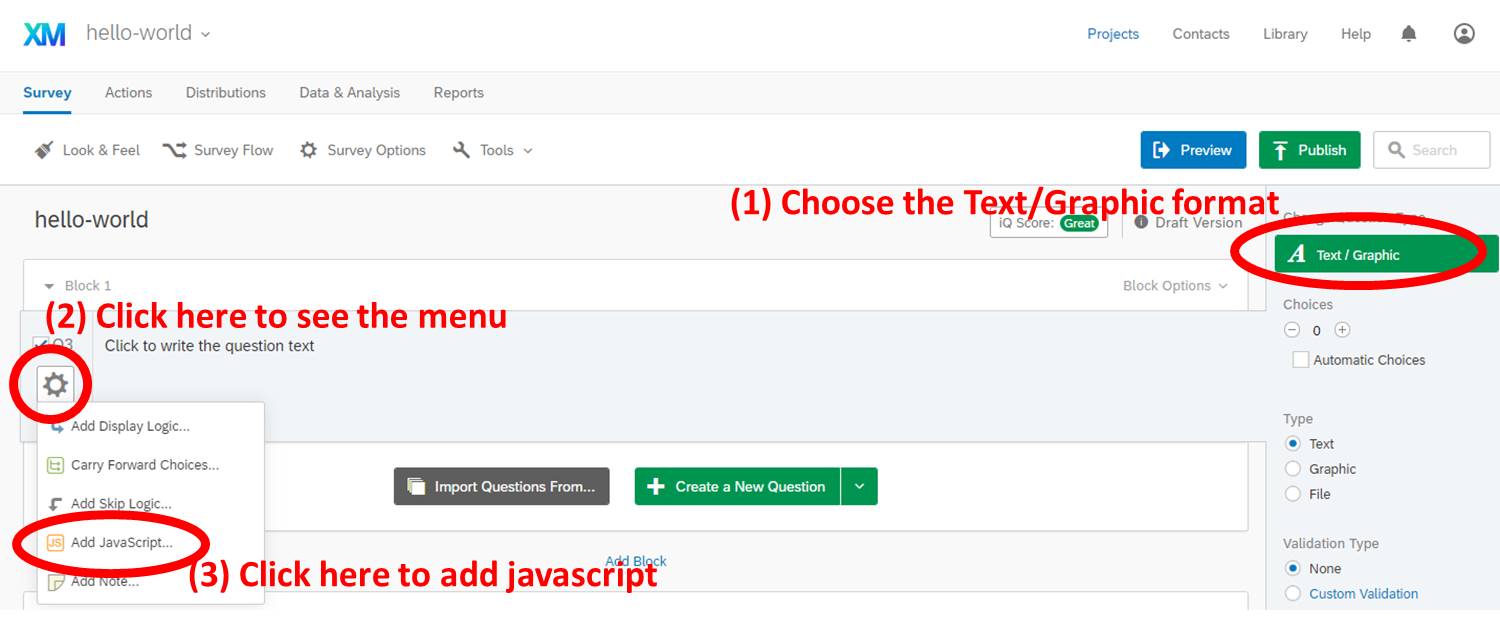
Step 2. Open the Question JavaScript editor and copy paste the whole experiment-transformed-qualtrics.js
Keep going in the above picture. (2) Click the gear to open the dropdown menu, and then (3) find and click Add JavaScript.
Then copy-paste the whole experiment-transformed-qualtrics.js (click to see the code) into the editor.
YOU MUST PUT THE SAVE URL that begins with https:// INTO THE CODE.
Step 3. Open the Question HTML editor and copy paste the below html code
The Change 3 section of the experiment-transformed-third.html file contains the link to jsPsych CSS file, the inline styles for display_stage Div, and the error message to be displayed when things go wrong.
To open the HTML editor, click the HTML View button.
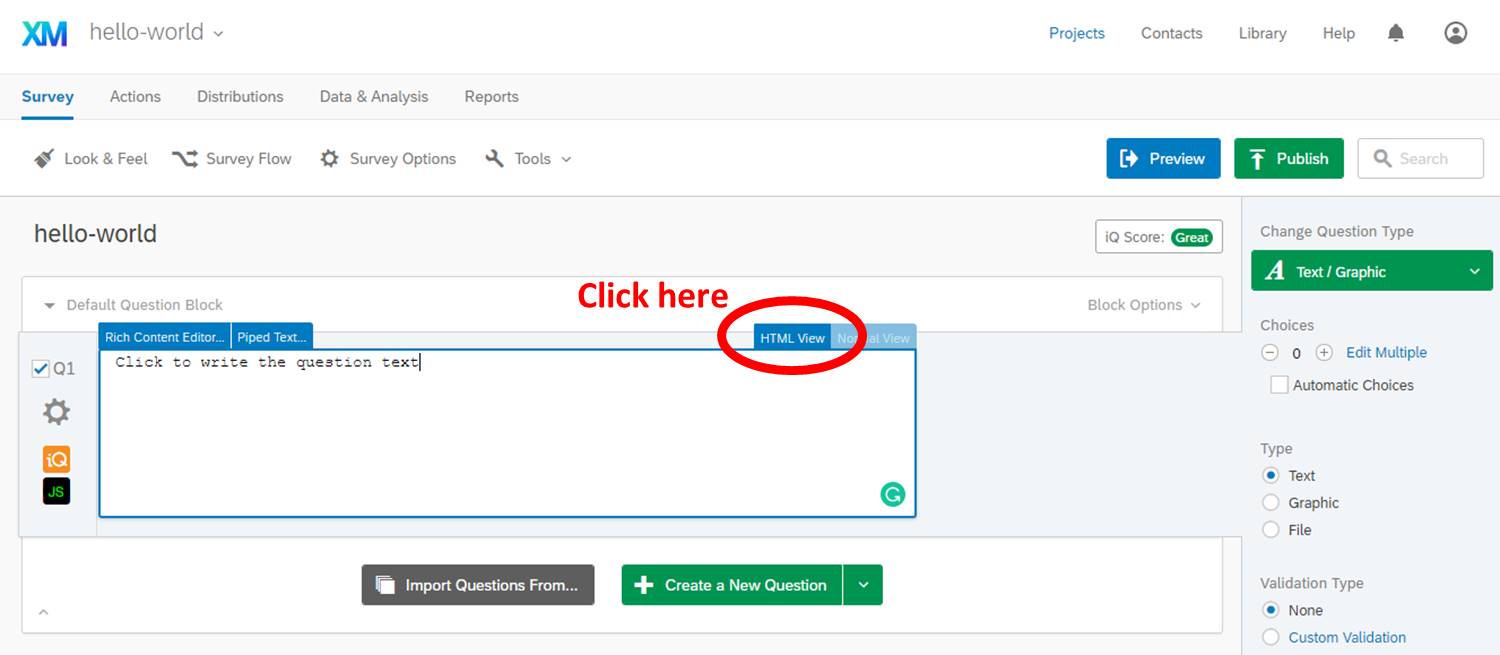
Then, copy paste the portion of experiment-transformed-third.html to the HTML editor, starting from <!-- COPY PASTE TO QUALTRICS FROM HERE --> to <!-- COPY PASTE TO QUALTRICS UP TO HERE -->.
<!-- Change 3: Adding extra scripts for Qualtrics -->
<!-- COPY PASTE TO QUALTRICS FROM HERE -->
<link href="https://kywch.github.io/STOP-IT/jsPsych_version/js/jspsych-6.0.5/css/jspsych.css" rel="stylesheet"
type="text/css">
</link>
<div>
<span style="font-size: 24px;">
<br><br>
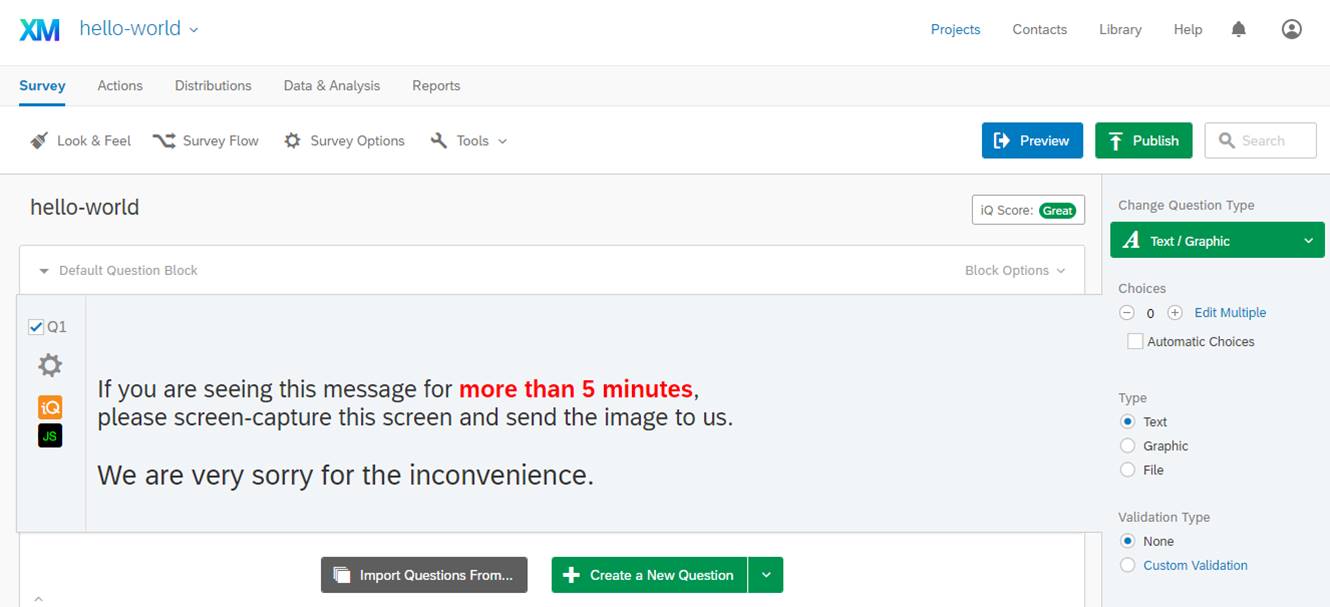
If you are seeing this message for <span style="color: rgb(255, 0, 0);"><b>more than 5
minutes</b></span>,<br>
please screen-capture this screen and send the image to us.
<br><br>
<span style="font-size: 28px;">We are very sorry for the inconvenience.</span>
</span>
</div>
<!-- Change 2: Adding `display_stage` CSS and Div -->
<style>
#display_stage_background {
width: 100vw;
background-color: white;
z-index: -1;
}
#display_stage {
position: fixed;
left: 1vw;
top: 1vh;
height: 98vh;
width: 98vw;
background-color: white;
box-shadow: 1px 1px 1px #999;
border-radius: 15px;
z-index: 0;
overflow-y: hidden;
overflow-x: hidden;
}
</style>
<!-- COPY PASTE TO QUALTRICS UP TO HERE -->
After copy pasting, you should see something like below.
Step 4. Create Embedded Data elements
To store the experiment results with the participant's ID, you need to create the Embedded Data elements named workerId in your survey by following this Qualtrics tutorial.
Why do I use the name workerId? For an answer, please read the Recruiting Participants section.
- Click Survey Flow from the Survey tab
- Click Add a New Element Here
- Choose Embedded Data
- Click Create New Field or Choose From Dropdown and type workerId
- Click Move of the new blocks you created (
Set Embedded DataandThen Branch If) and move these blocks the top of Survey Flow
Step 5. Publish and test!
Publish the survey by following this Qualtrics tutorial. Then, an anonymous Qualtrics link is generated. If you click this link, you should be able to see the same STOP-IT Stop Signal Task running in Qualtrics. For example, try this Qualtrics link.
DOUBLE CHECK WHETHER THE TRIAL-BY-TRIAL DATA IS SAVED TO YOUR DROPBOX.
Explaining the code changes
Using the GitHub-hosted images: configuration/experiment_variables.js
The original STOP-IT task uses the stimuli images in the images folder placed with the experiment html. But since these images are available online once you enable your GitHub Pages, you can use these images.
For example, the images/fix.png is available at https://<your-github-username>.github.io/<your-experiment-name>/jsPsych_version/images/fix.png. For example, https://kywch.github.io/STOP-IT/jsPsych_version/images/fix.png.
So, I modifed the fix_stim, go_stim1, go_stim2, stop_stim1, and stop_stim2 variables in the configuration/experiment_variables.js by adding the repo_site variable like below.
// define the site that hosts stimuli images
// usually https://<your-github-username>.github.io/<your-experiment-name>/
var repo_site = 'https://kywch.github.io/STOP-IT/jsPsych_version/';

// locate the stimuli that will be used in the experiment
var fix_stim = repo_site + 'images/fix.png';
var go_stim1 = repo_site + 'images/go_left.png';
var go_stim2 = repo_site + 'images/go_right.png';
var stop_stim1 = repo_site + 'images/stop_left.png';
var stop_stim2 = repo_site + 'images/stop_right.png';
Please compare the original experiment_variables.js (click to see the code) vs. the modified experiment_variables.js (click the see the code).
First transformation: experiment-transformed-first.html and stop-it_main.js
I prefer to separate out the experiment-related code from the operation-related code, following the Experiment Factory style. If you haven't, please visit the Experiment Factory library, which contain a ton of experiments with running demos and their code.
In the experiment.html (click to see the code), defining the components that go into the timeline can be considered to be experiment-related, and the remaining parts that also appear in the Hello-World example, such as loading jspsych.js and jsPsych.init() can be considered to be operation-related. So, I separated the experiment-related code and the operation-related code and putting the code into stop-it_main.js (click to see the code) and experiment-transformed-first.html (click to see the code), respectively.
In addition, the original STOP-IT code includes the consent, participant_id, gender pages, etc, but these pages can be better handled by Qualtrics. So, I took these pages out and isolated the stop signal task. Please take a moment to look at the stop-it_main.js (click to see the code) and experiment-transformed-first.html (click to see the code) files and compare these to the original experiment.html (click to see the code).
Double click both experiment.html and experiment-transformed-first.html in your local folder and see if these work well.
Second transformation (display_element): experiment-transformed-second.html
Adding the display_element parameter in the jsPsych.init() and having additional control over the display element is important for embedding jsPsych into Qualtrics. The experiment-transformed-second.html (click to see the code) contains three changes from the experiment-transformed-first.html (click to see the code). When you open experiment-transformed-second.html in a browser, you should see the same Stop Signal Task.
Let's look at each change.
Change 1: Using display_element
By adding the display_element parameter in the jsPsych.init() like below, jsPsych will render the experiment in the <div> called display_stage, which the current script does not have yet. So, let's add the display_stage.
  // run the experiment!
  jsPsych.init({

    /* Change 1: Using `display_element` */
    display_element: 'display_stage',

    timeline: timeline,

    preload_images: [fix_stim, go_stim1, go_stim2, stop_stim1, stop_stim2],
Change 2: Adding display_stage CSS and Div
The display_stage needs below CSS and HTML code after the <body> tag, which also include the display_stage_background. Both are necessary to function well.
<!-- Change 2: Adding `display_stage` CSS and Div -->
<style>
#display_stage_background {
    width: 100vw;
    background-color: white;
    z-index: -1;
}

#display_stage {
    position: fixed;
    left: 1vw;
    top: 1vh;
    height: 98vh;
    width: 98vw;
    background-color: white;
    box-shadow: 1px 1px 1px #999;
    border-radius: 15px;
    z-index: 0;
    overflow-y: hidden;
    overflow-x: hidden;
}
</style>
<!-- COPY PASTE TO QUALTRICS UP TO HERE -->

<div id='display_stage_background'></div>
<div id='display_stage'></div>
Change 3: Adding extra scripts for Qualtrics
The below scripts are not necessary to run this task, but you need to copy-paste these in Qualtrics later.
One critical point is that now we use the jsPsych stylesheet hosted in the GitHub Pages (explained above in the Hosting jsPsych section) instead of the CSS file in your computer. This is important because Qualtrics can also access the GitHub-hosted files.
<!-- Change 3: Adding extra scripts for Qualtrics -->
<!-- COPY PASTE TO QUALTRICS FROM HERE -->
<link href="https://kywch.github.io/STOP-IT/jsPsych_version/js/jspsych-6.0.5/css/jspsych.css" rel="stylesheet"
type="text/css">
</link>
<div>
<span style="font-size: 24px;">
    <br><br>
    If you are seeing this message for <span style="color: rgb(255, 0, 0);"><b>more than 5
        minutes</b></span>,<br>
    please screen-capture this screen and send the image to us.
    <br><br>
    <span style="font-size: 28px;">We are very sorry for the inconvenience.</span>
</span>
</div>
Third transformation (save to PHP): experiment-transformed-third.html
To make experiment-transformed-third.html (click to see the code) work and save the trial-by-trial data file, you should set up your Dropbox App and get your Dropbox access token. To do so, see the above instructions.
The experiment-transformed-third.html (click to see the code) contains three additional changes from experiment-transformed-second.html (click to see the code). Let's look at these additional change.
Change 4-5: Defining necessary variables and functions for saving the results
You can set task_id and/or data_dir as you like. However, you must provide a correct save_url.
// you must put your save_data php url here.
// like https://users.rcc.uchicago.edu/~kywch/exp_data/save_data.php
var save_url = "<PUT YOUR SAVE URL HERE>";

function save_data(data_dir, file_name) {
    var selected_data = filter_data();
    console.log("Save data function called.");
    try {
        jQuery.ajax({
            type: 'post',
            cache: false,
            url: save_url,
            data: {
                data_dir: data_dir,
                file_name: file_name + '.csv', // the file type should be added
                exp_data: selected_data.csv()
            }
        });
    } catch (err) {
        console.log("Save data function failed.", err);
    }
}
Also, sbj_id, and thus file_name, must be unique. Otherwise, you will lose the data. That's why the random number is used when sbj_id is empty.
// experimental session-defining variables
flag_debug = true;
task_id = "STOP-IT";
sbj_id = "${e://Field/workerId}";
if (!sbj_id.trim()) {
    sbj_id = Math.random().toString(36).slice(-6);
    try {
        Qualtrics.SurveyEngine.setEmbeddedData("workerId", sbj_id);
    } catch (err) {
        console.log('Warning: ', err);
    }
}

// PHP-based data save function
// save_data needs data_dir and file_name
// my preference is to include the task id/name and sbj_id in the file name
var data_dir = task_id;
var file_name = task_id + '_' + sbj_id + '.csv';
Change 6: Sending the results file upon completion
The on_finish callback can be declared in the jsPsych.init method.
For details, see the original jsPsych tutorial.
The callback will trigger once all trials in the experiment have been run, so it is a great place to call save functions.
    /* Change 6: Sending the results file upon completion */

    on_finish: function () {
        save_data(data_dir, file_name);
    },
Fourth transformation: experiment-transformed-qualtrics.js
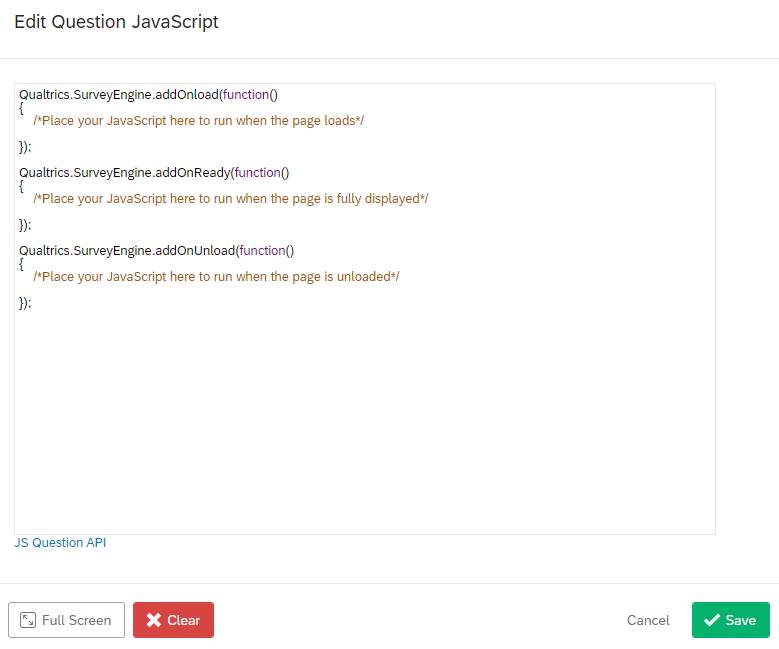
To make your jsPsych experiment work in Qualtrics, you need to add your code to the below skeleton provided by Qualtrics Question JavaScript Editor. For details, see the Add JavaScript help page.
Qualtrics.SurveyEngine.addOnload(function()
{
    /*Place your JavaScript here to run when the page loads*/

});

Qualtrics.SurveyEngine.addOnReady(function()
{
    /*Place your JavaScript here to run when the page is fully displayed*/

});

Qualtrics.SurveyEngine.addOnUnload(function()
{
    /*Place your JavaScript here to run when the page is unloaded*/

});
Let's look at each change.
Change 1: Hiding the Next button
The below javascript code hides the Next button and puts the javascript code in the driving seat.
/* Change 1: Hiding the Next button */
// Retrieve Qualtrics object and save in qthis
var qthis = this;

// Hide buttons
qthis.hideNextButton();
Change 2: Defining and load required resources
The below javascript defines where the necessary files are so that Qualtrics can load these. If you enabled GitHub Pages of your repository, Qualtrics can load the necessary JS, CSS, and image files right away.
/* Change 2: Defining and load required resources */
var task_github = "https://kywch.github.io/STOP-IT/jsPsych_version/"; // https://<your-github-username>.github.io/<your-experiment-name>

// requiredResources must include all the JS files that demo-simple-rt-task-transformed.html uses.
var requiredResources = [
    "https://cdnjs.cloudflare.com/ajax/libs/dropbox.js/4.0.30/Dropbox-sdk.min.js",
    task_github + "js/jspsych-6.0.5/jspsych.js",
    task_github + "js/jspsych-6.0.5/plugins/jspsych-instructions.js",
    task_github + "js/jspsych-6.0.5/plugins/jspsych-fullscreen.js",
    task_github + "js/jspsych-6.0.5/plugins/jspsych-call-function.js",
    task_github + "js/jspsych-6.0.5/plugins/jspsych-html-keyboard-response.js",
    task_github + "js/jspsych-detect-held-down-keys.js",
    task_github + "js/custom-stop-signal-plugin.js",
    task_github + "js/sprintf.js",
    task_github + "configuration/experiment_variables.js",
    task_github + "configuration/text_variables.js",
    task_github + "stop-it_main.js"
];

function loadScript(idx) {
    console.log("Loading ", requiredResources[idx]);
    jQuery.getScript(requiredResources[idx], function () {
        if ((idx + 1) < requiredResources.length) {
            loadScript(idx + 1);
        } else {
            initExp();
        }
    });
}

if (window.Qualtrics && (!window.frameElement || window.frameElement.id !== "mobile-preview-view")) {
    loadScript(0);
}
Change 3: Appending the display_stage Div using jQuery
In Qualtrics, jQuery (loaded by default) is used to append the display_stage_background and display_stage Divs. The CSS for these elements will be added directly to Question HTML later in this tutorial.
/* Change 3: Appending the display_stage Div using jQuery */
// jQuery is loaded in Qualtrics by default
jQuery("<div id = 'display_stage_background'></div>").appendTo('body');
jQuery("<div id = 'display_stage'></div>").appendTo('body');
Change 4: Adding save and helper functions
/* Change 4: Adding save and helper functions */
function filter_data() {
    var ignore_columns = ['raw_rt', 'trial_type', 'first_stimulus', 'second_stimulus', 'onset_of_first_stimulus',
        'onset_of_second_stimulus', 'key_press', 'correct_response', 'trial_index', 'internal_node_id'
    ];
    var rows = {
        trial_type: 'custom-stop-signal-plugin'
    }; // we are only interested in our main stimulus, not fixation, feedback etc.
    var selected_data = jsPsych.data.get().filter(rows).ignore(ignore_columns);
    // the next piece of codes orders the columns of the data file
    var d = selected_data.values() // get the data values
    // make an array that specifies the order of the object properties
    var arr = ['block_i', 'trial_i', 'stim', 'signal', 'SSD', 'response', 'rt', 'correct',
        'focus', 'Fullscreen', 'time_elapsed', 'window_resolution'
    ];
    new_arr = [] // we will fill this array with the ordered data
    function myFunction(item) { // this is function is called in the arr.forEach call below
        new_obj[item] = obj[item]
        return new_obj
    }
    // do it for the whole data array
    for (i = 0; i < d.length; i++) {
        obj = d[i]; // get one row of data
        new_obj = {};
        arr.forEach(myFunction) // for each element in the array run my function
        selected_data.values()[i] = new_obj; // insert the ordered values back in the jsPsych.data object
    }
    return selected_data;
}

// you must put your save_data php url here.
// like https://users.rcc.uchicago.edu/~kywch/exp_data/save_data.php
var save_url = "<PUT YOUR SAVE URL HERE>";

function save_data(data_dir, file_name) {
    var selected_data = filter_data();
    console.log("Save data function called.");
    try {
        jQuery.ajax({
            type: 'post',
            cache: false,
            url: save_url,
            data: {
                data_dir: data_dir,
                file_name: file_name + '.csv', // the file type should be added
                exp_data: selected_data.csv()
            }
        });
    } catch (err) {
        console.log("Save data function failed.", err);
    }
}
Change 5: Wrapping jsPsych.init() in a function
The main experiment codes are wrapped in the initExp function to make sure it runs after all the necessary library and plugin files are loaded (as defined in the loadScript function above).
Please look carefully at the variable sbj_id. It first looks at Qualtrics' embedded data workerId. If it's empty, then the code generates a random sequence and use it as sbj_id so that the saved data file is almost always unique.
/* Change 5: Wrapping jsPsych.init() in a function */
function initExp() {

    // experimental session-defining variables
    flag_debug = true;
    task_id = "STOP-IT";
    sbj_id = "${e://Field/workerId}";
    if (!sbj_id.trim()) {
        sbj_id = Math.random().toString(36).slice(-6);
        try {
            Qualtrics.SurveyEngine.setEmbeddedData("workerId", sbj_id);
        } catch (err) {
            console.log('Warning: ', err);
        }
    }

    // PHP-based data save function
    // save_data needs data_dir and file_name
    // my preference is to include the task id/name and sbj_id in the file name
    var data_dir = task_id;
    var file_name = task_id + '_' + sbj_id + '.csv';

    // push all the procedures, which are defined in stop-it_main.js to the overall timeline
    var timeline = []; // this array stores the events we want to run in the experiment
    timeline.push(start_procedure, block_procedure, end_procedure);

    jsPsych.init({
        display_element: 'display_stage',
        timeline: timeline,
        preload_images: [fix_stim, go_stim1, go_stim2, stop_stim1, stop_stim2],

        // ... omitted

        }
    });
Change 6: Adding the clean up and continue functions
When the jsPsych ends, display_stage and display_stage_background should be removed. Then, the script executes the clickNextButton to simulate clicking the Next button and proceed to the next question.
    on_finish: function () {
        save_data(data_dir, file_name);

        /* Change 6: Adding the clean up and continue functions.*/
        // clear the stage
        jQuery('#display_stage').remove();
        jQuery('#display_stage_background').remove();

        // simulate click on Qualtrics "next" button, making use of the Qualtrics JS API
        qthis.clickNextButton();
    }