Embedding Reactive AGression Task (RC-RAGE) into Qualtrics
An improved costly-reactive-aggression paradigm, called Retaliate or Carry-on: Reactive AGression Experiment (RC-RAGE), by Meidenbauer, Choe, Bakkour, Inzlicht & Berman (2021) was implemented using jsPsych. You can first try the task by clicking HERE.
The RC-RAGE code is freely available at the RC-RAGE GitHub repository. You can either directly use these files for your study or fork this repository to customize.
This tutorial consists of two parts. (1) I will first explain how you can embed RC-RAGE in Qualtrics. (2) I will then explain the experiment code.
Embedding RC-RAGE into Qualtrics
Hosting the RC-RAGE scripts in GitHub
To use jsPsych in Qualtrics, the jsPsych javascript and CSS files need to be online and loadable from Qualtrics. Creating a GitHub repository for your experiment helps you do so in simple steps.
- Go to the RC-RAGE GitHub repository.
- Follow the Hosting jsPsych tutorial to fork it to your GitHub repository and make the scripts available online.
- Also make sure that sound files play on your browser.
When you are done, you can check the online files with your browser by directly going to the jspsych.js, rc-rage.css, jspsych-fullscreen.js, and rc-rage_main.js.
- jspsych.js should be available at
https://<your-github-username>.github.io/RC-RAGE_jsPsych/lib/jspsych-6.1.0/jspsych.js, like https://kywch.github.io/RC-RAGE_jsPsych/lib/jspsych-6.1.0/jspsych.js. - rc-rage.css should be available at
https://<your-github-username>.github.io/RC-RAGE_jsPsych/lib/jspsych-6.1.0/css/jspsych.css, like https://kywch.github.io/RC-RAGE_jsPsych/lib/jspsych-6.1.0/css/jspsych.css. - jspsych-fullscreen.js should be available at
https://<your-github-username>.github.io/RC-RAGE_jsPsych/lib/jspsych-6.1.0/plugins/jspsych-fullscreen.js, like https://kywch.github.io/RC-RAGE_jsPsych/lib/jspsych-6.1.0/plugins/jspsych-fullscreen.js. - rc-rage_main.js should be available at
https://<your-github-username>.github.io/RC-RAGE_jsPsych/lib/jspsych-mood-induction.js, like https://kywch.github.io/RC-RAGE_jsPsych/lib/rc-rage_main.js.
Sound files are stored in the sounds folder and should be available to play online.
Embedding the task to Qualtrics
Let's log in to Qualtrics and take a look at each step.
Step 1. Create a new Qualtrics project and then a new question
First, create a new Qualtrics project. Then, create a new question and (1) change its format to Text/Graphic.
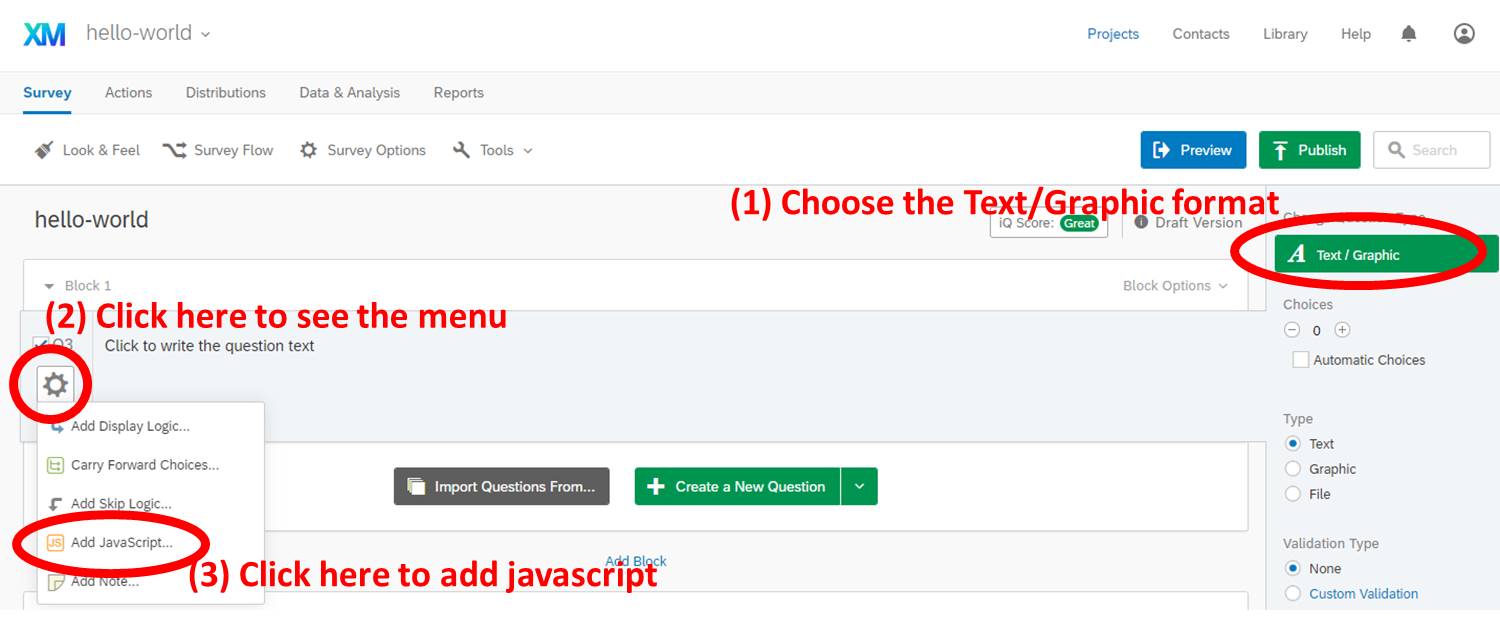
Step 2. Open the Question JavaScript editor and copy paste the whole rc-rage-qualtrics.js
Keep going in the above picture. (2) Click the gear to open the dropdown menu, and then (3) find and click Add JavaScript.
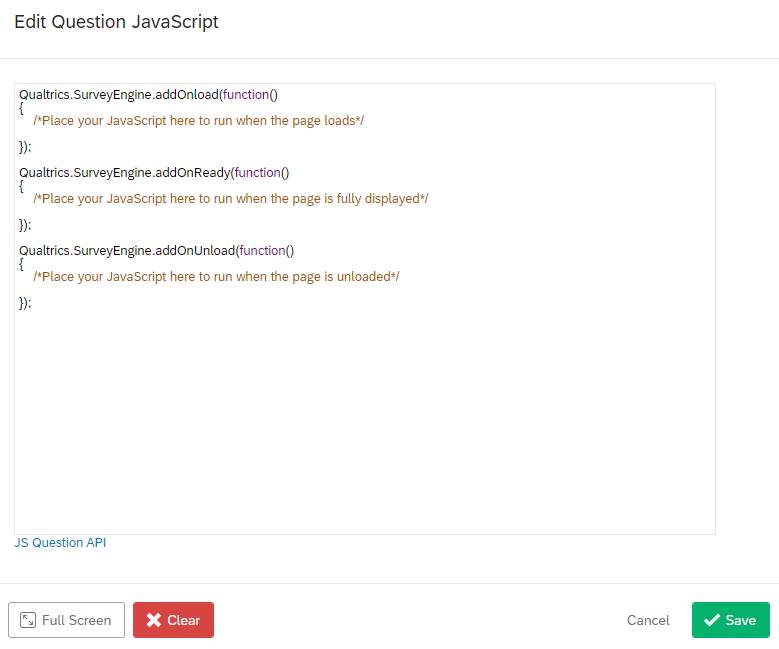
Then copy-paste the whole rc-rage-qualtrics.js (click to see the code) into the editor.
ALSO CHECK WHETHER THE URL, task_github, IS VALID.
Step 3. Open the Question HTML editor and copy paste the below html code
The Change 3 section of the rc-rage-demo.html file contains the link to jsPsych CSS file, the inline styles for display_stage Div, and the error message to be displayed when things go wrong.
To open the HTML editor, click the HTML View button.
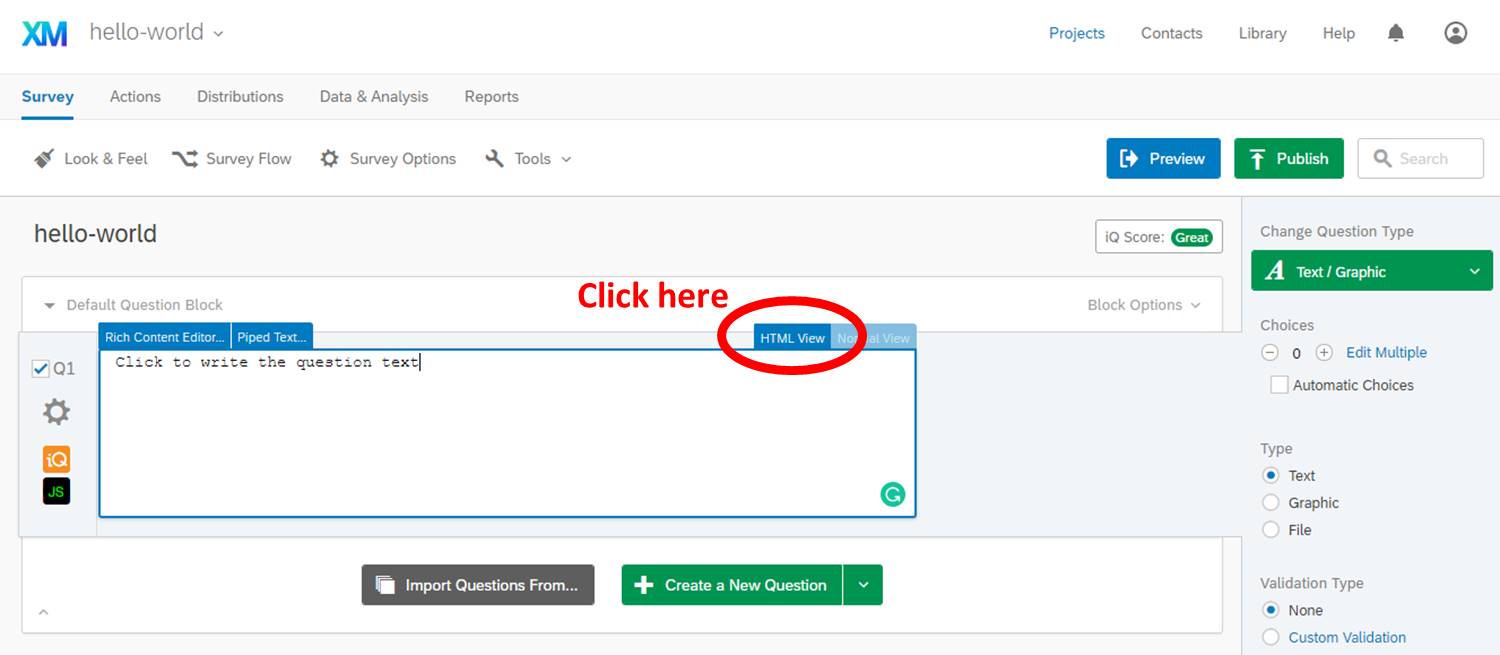
Then, copy paste the portion of rc-rage-demo.html to the HTML editor, starting from <!-- COPY PASTE TO QUALTRICS FROM HERE --> to <!-- COPY PASTE TO QUALTRICS UP TO HERE -->.
<!-- Step 2: Add `display_stage` CSS, DIV, and extra scripts for Qualtrics -->
<!-- COPY PASTE TO QUALTRICS FROM HERE -->
<link href="https://kywch.github.io/RC-RAGE_jsPsych/lib/rc-rage.css" rel="stylesheet" type="text/css">
</link>
<div>
<span style="font-size: 24px;">
    <br><br>
    If you are seeing this message for <span style="color: rgb(255, 0, 0);">
    <b>more than 5 minutes</b></span>,<br>
    please screen-capture this screen and send the image to us.
    <br><br>
    <span style="font-size: 28px;">We are very sorry for the inconvenience.</span>
</span>
</div>

<style>
#display_stage_background {
    width: 100vw;
    background-color: white;
    z-index: -1;
}

#display_stage {
    position: fixed;
    left: 1vw;
    top: 1vh;
    height: 98vh;
    width: 98vw;
    background-color: white;
    box-shadow: 1px 1px 1px #999;
    border-radius: 15px;
    z-index: 0;
    overflow-y: hidden;
    overflow-x: hidden;
}
</style>
<!-- COPY PASTE TO QUALTRICS UP TO HERE -->
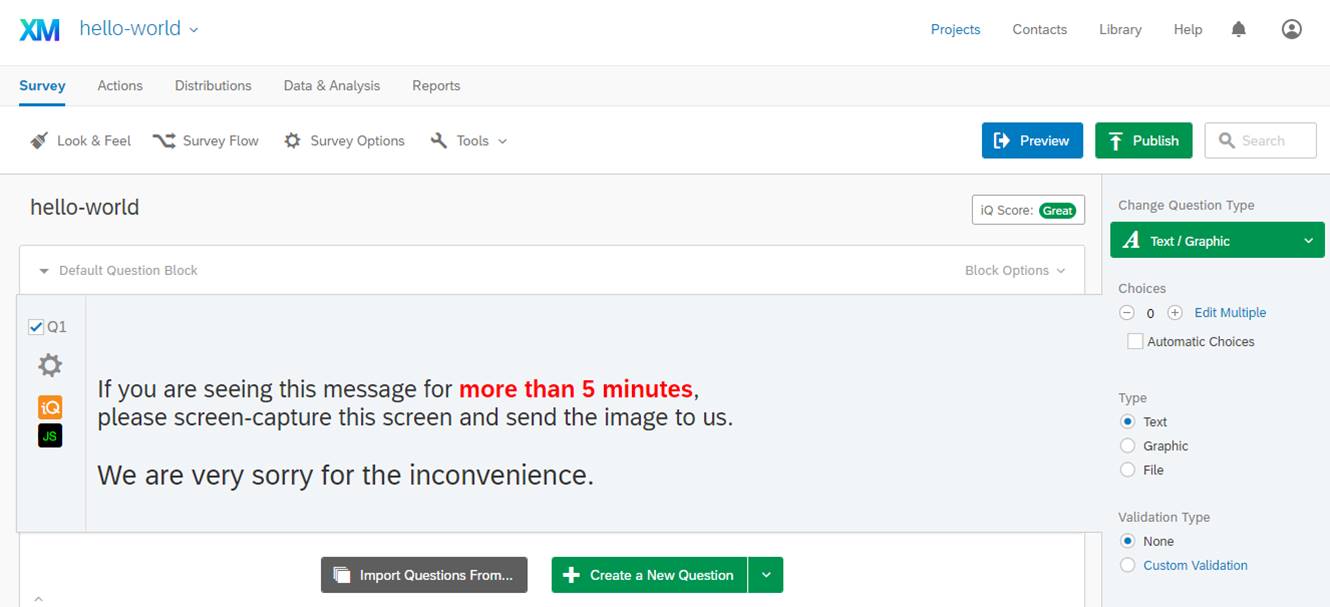
After copy pasting, you should see something like below.
Step 4. Create Embedded Data elements
To store the addition details about this audio test, you need to create the Embedded Data elements named bonus, click_cnt, finished_trial_cnt, provoked_cnt, kill_cnt, planned_trial, and wasted_click_history in your survey by following this Qualtrics tutorial.
- Click Survey Flow from the Survey tab
- Click Add a New Element Here
- Choose Embedded Data
- Click Create New Field or Choose From Dropdown and type bonus
- Click Add a New Field and type click_cnt
- Click Add a New Field and type finished_trial_cnt
- Click Add a New Field and type provoked_cnt
- Click Add a New Field and type kill_cnt
- Click Add a New Field and type planned_trial
- Click Add a New Field and type wasted_click_history
- Click Add a New Field and type trial_data
- Click Move of the new blocks you created (
Set Embedded DataandThen Branch If) and move these blocks the top of Survey Flow
Step 5. Publish and test!
Publish the survey by following this Qualtrics tutorial. Then, an anonymous Qualtrics link is generated. If you click this link, you should be able to see the same Audio Test running in Qualtrics. For example, try this Qualtrics link.
Explaining the code
For the basics, please read the Hello world tutorial.
A working demo in a local browser: rc-rage-demo.html
You should be able to run RC-RAGE simply by opening rc-rage-demo.html in a browser (with all other files downloaded in put into the folder like the GitHub repo).
I broke down the html file into 5 steps/parts. Let's look at each step.
Step 1. Define and load required resources
RC-RAGE uses jQuery, so it should be loaded. Also, the below scripts load all the necessary files.
<!-- Step 1. Define and load required resources -->
<script src='https://ajax.googleapis.com/ajax/libs/jquery/2.2.4/jquery.min.js'></script>
<script src='lib/jspsych-6.1.0/jspsych.js'></script>
<script src='lib/jspsych-6.1.0/plugins/jspsych-fullscreen.js'></script>
<script src='lib/jspsych-6.1.0/plugins/jspsych-instructions.js'></script>
<script src='lib/jspsych-6.1.0/plugins/jspsych-html-keyboard-response.js'></script>
<script src='lib/jspsych-audio-keyboard-with-replay.js'></script>
<script src='lib/jspsych-rc-rage.js'></script>
<script src='lib/rc-rage_main.js'></script>
Step 2: Add display_stage CSS, DIV, and extra scripts for Qualtrics
The display_stage needs below CSS and HTML code after the <body> tag, which also include the display_stage_background. Both are necessary to function well.
<!-- Step 2: Add `display_stage` CSS, DIV, and extra scripts for Qualtrics -->
<!-- COPY PASTE TO QUALTRICS FROM HERE -->
<link href="https://kywch.github.io/RC-RAGE_jsPsych/lib/rc-rage.css" rel="stylesheet" type="text/css"></link>
<div>
<span style="font-size: 24px;">
    <br><br>
    If you are seeing this message for <span style="color: rgb(255, 0, 0);">
    <b>more than 5 minutes</b></span>,<br>
    please screen-capture this screen and send the image to us.
    <br><br>
    <span style="font-size: 28px;">We are very sorry for the inconvenience.</span>
</span>
</div>

<style>
#display_stage_background {
    width: 100vw;
    background-color: white;
    z-index: -1;
}

#display_stage {
    position: fixed;
    left: 1vw;
    top: 1vh;
    height: 98vh;
    width: 98vw;
    background-color: white;
    box-shadow: 1px 1px 1px #999;
    border-radius: 15px;
    z-index: 0;
    overflow-y: hidden;
    overflow-x: hidden;
}
</style>
<!-- COPY PASTE TO QUALTRICS UP TO HERE -->

<div id='display_stage_background'></div>
<div id='display_stage'></div>
Step 3: Define the experiment flow
The below scripts construct an experiment session using the functions defined in the rc-rage_main.js file, which are get_instruction_imglist, generate_instruction_block, generate_practice_block, and generate_main_block. Please see the rc-rage_main.js (click to see the code) for their definitions.
    /* Step 3: Define the experiment flow */
    // NOTE that the functions used below are defined in `rc-rage_main.js` for readability
    var instr_url = 'instruction/';
    var instr_imglist = get_instruction_imglist(instr_url, 30);

    var jspsych_session = [];

    // use the full screen
    jspsych_session.push({
    type: 'fullscreen',
    fullscreen_mode: true
    });

    jspsych_session.push({
    timeline: generate_instruction_block(instr_imglist)
    });

    jspsych_session.push({
    timeline: generate_practice_block()
    });

    jspsych_session.push({
    timeline: generate_main_block()
    });
Step 4: Show the aggregate session-level data
To aggregate session-level data eaily, rc-rage_main.js has defined main_score, main_seq, click_history, and wasted_click_history. The below script takes advantage of these variables rather than going through the all raw data and shows the aggregated results for debugging. In the actual study, we only showed the bonus amount.
/* Step 4: Show the aggregate session-level data */
// NOTE that main_score, main_seq, click_history, wasted_click_history are defined in rc-rage_main.js
// The below lines take advantage of these rather than going through the raw data
jspsych_session.push({
type: "html-keyboard-response",
stimulus: function () {

    // performance-based bonus in dollar (in string)
    let bonus = (main_score / 100).toFixed(2);

    // the trial sequence (specifies when the robber appears)
    let trial_seq = main_seq;
    trial_seq.forEach(function (item, ii) {
    if (item > 1000) trial_seq[ii] = -1; // robber did not appear
    });
    trial_seq = trial_seq.toString().replace(/,/g, ';');

    // participants' click counts for each trial
    let click_cnt = click_history.reduce(function (a, b) {
    return (a + b);
    }).toString();

    // completed trials (within the time limit)
    var comp_trial_cnt = wasted_click_history.filter(x => x >= 0).length;

    // the number of trials, in which the robber appeared
    var provoked_cnt = main_seq.slice(0, comp_trial_cnt).filter(x => x > 0).length;

    // the number of trials, in which the robber was killed by retailation
    var kill_cnt = wasted_click_history.filter(x => x > 0).length;

    return "<div class = centerbox><p><p>" +
    "<p class = block-text>Your performance-based bonus: $" + bonus + "</p>" +
    "<p class = block-text>Number of completed trials: " + comp_trial_cnt + " out of " + main_seq.length
    .toString() + "</p>" +
    "<p class = block-text>Number of provocations: " + provoked_cnt + "</p>" +
    "<p class = block-text>Number of retaliations: " + kill_cnt + "</p>" +
    "<p class = block-text>Press any key to complete the experiment. Thank you!</p></div>";
}
});
Step 5: Run the experiment
/* Step 5: Run the experiment. */
jsPsych.init({

display_element: 'display_stage',
timeline: jspsych_session,
preload_images: instr_imglist,

exclusions: { // browser window needs to have these dimensions, if not, participants get the chance to maximize their window, if they don't support this resolution when maximized they can't particiate.
    min_width: 1000,
    min_height: 700
}
});
Qualtrics transformation: rc-rage-qualtrics.js
To make your jsPsych experiment work in Qualtrics, you need to add your code to the below skeleton provided by Qualtrics Question JavaScript Editor. For details, see the Add JavaScript help page.
Qualtrics.SurveyEngine.addOnload(function()
{
    /*Place your JavaScript here to run when the page loads*/

});

Qualtrics.SurveyEngine.addOnReady(function()
{
    /*Place your JavaScript here to run when the page is fully displayed*/

});

Qualtrics.SurveyEngine.addOnUnload(function()
{
    /*Place your JavaScript here to run when the page is unloaded*/

});
Let's look at each change.
Change 1: Hiding the Next button
The below javascript code hides the Next button and puts the javascript code in the driving seat.
/* Change 1: Hiding the Next button */
// Retrieve Qualtrics object and save in qthis
var qthis = this;

// Hide buttons
qthis.hideNextButton();
Change 2: Defining and load required resources
The below javascript defines where the necessary files are so that Qualtrics can load these. If you enabled GitHub Pages of your repository, Qualtrics can load the necessary JS, CSS, and image files right away.
    /* Change 2: Defining and loading required resources */
    // `requiredResources` must include all the required JS files
    var task_github = "https://kywch.github.io/RC-RAGE_jsPsych/"; // https://<your-github-username>.github.io/<your-experiment-name>
    var requiredResources = [
        task_github + "lib/jspsych-6.1.0/jspsych.js",
        task_github + "lib/jspsych-6.1.0/plugins/jspsych-fullscreen.js",
        task_github + "lib/jspsych-6.1.0/plugins/jspsych-instructions.js",
        task_github + "lib/jspsych-6.1.0/plugins/jspsych-html-keyboard-response.js",
        task_github + "lib/jspsych-audio-keyboard-with-replay.js",
        task_github + "lib/jspsych-rc-rage.js",
        task_github + "lib/rc-rage_main.js"
    ];

    function loadScript(idx) {
        console.log("Loading ", requiredResources[idx]);
        jQuery.getScript(requiredResources[idx], function () {
            if ((idx + 1) < requiredResources.length) {
                loadScript(idx + 1);
            } else {
                initExp();
            }
        });
    }

    if (window.Qualtrics && (!window.frameElement || window.frameElement.id !== "mobile-preview-view")) {
        loadScript(0);
    }
Change 3: Appending the display_stage Div using jQuery
In Qualtrics, jQuery (loaded by default) is used to append the display_stage_background and display_stage Divs. The CSS for these elements will be added directly to Question HTML later in this tutorial.
/* Change 3: Appending the display_stage Div using jQuery */
// jQuery is loaded in Qualtrics by default
jQuery("<div id = 'display_stage_background'></div>").appendTo('body');
jQuery("<div id = 'display_stage'></div>").appendTo('body');
Change 4: Wrapping jsPsych.init() in a function
The main experiment codes are wrapped in the initExp function to make sure it runs after all the necessary library and plugin files are loaded (as defined in the loadScript function above).
/* Change 4: Wrapping jsPsych.init() in a function */
function initExp() {

    // these are to pre-load instruction images
    var instr_url = task_github + 'instruction/';
    var instr_imglist = get_instruction_imglist(instr_url, 30);

    // push all the procedures, which are defined in stop-it_main.js to the overall timeline
    var jspsych_session = []; // this array stores the events we want to run in the experiment

    // use the full screen
    jspsych_session.push({
        type: 'fullscreen',
        fullscreen_mode: true
    });

    jspsych_session.push({
        timeline: generate_instruction_block(instr_imglist)
    });

    jspsych_session.push({
        timeline: generate_practice_block()
    });

    jspsych_session.push({
        timeline: generate_main_block()
    });

    // exit the full screen
    jspsych_session.push({
        type: 'fullscreen',
        fullscreen_mode: false
    });

    jsPsych.init({
        display_element: 'display_stage',
        timeline: jspsych_session,
        preload_images: instr_imglist,

        exclusions: { // browser window needs to have these dimensions, if not, participants get the chance to maximize their window, if they don't support this resolution when maximized they can't particiate.
            min_width: 1000,
            min_height: 700
        },

    // see the Change 5

});
Changes 5-6: Summarizing and saving the results, then finishing the study
This script saves additional data (script order and spent time)) to Qualtrics Embedded Data to simplify the analysis.
The trial_data is a csv-like string with space (' ') as the delimiter and semicolor (';') as the newline character. The columns are: trial, steal_timing, finish_code, click_cnt, extra_click, points, rt, time_remain. This string can be turned into the csv format by this python command. Please see this google colab page for a working example.
# python code
result_csv = result_string.strip().replace(';', '\n').replace(' ', ',')
When the jsPsych ends, display_stage and display_stage_background should be removed.
After saving, the script executes the clickNextButton to simulate clicking the Next button and proceed to the next question.
on_finish: function () {

    /* Change 5: Summarizing and saving the results, then finishing the study */

    // NOTE that main_score, main_seq, click_history, wasted_click_history
    // are all alreday defined in rc-rage_main.js
    // The below lines take advantage of these variables rather than going through the raw data

    // performance-based bonus in dollar (in string)
    let bonus = (main_score / 100).toFixed(2);

    // the trial sequence (specifies when the robber appears)
    let trial_seq = main_seq;
    trial_seq.forEach(function (item, ii) {
        if (item > 1000) trial_seq[ii] = -1; // robber did not appear
    });
    trial_seq = trial_seq.toString().replace(/,/g, ';');

    // participants' click counts for each trial
    let click_cnt = click_history.reduce(function (a, b) {
        return (a + b);
    }).toString();

    // completed trials (within the time limit)
    var comp_trial_cnt = wasted_click_history.filter(x => x >= 0).length;

    // the number of trials, in which the robber appeared
    var provoked_cnt = main_seq.slice(0, comp_trial_cnt).filter(x => x > 0).length;

    // the number of trials, in which the robber was killed by retailation
    var kill_cnt = wasted_click_history.filter(x => x > 0).length;

    // save the session-level data to Qualtrics
    Qualtrics.SurveyEngine.setEmbeddedData("bonus", bonus);
    Qualtrics.SurveyEngine.setEmbeddedData("click_cnt", click_cnt);
    Qualtrics.SurveyEngine.setEmbeddedData("finished_trial_cnt", comp_trial_cnt);
    Qualtrics.SurveyEngine.setEmbeddedData("provoked_cnt", provoked_cnt);
    Qualtrics.SurveyEngine.setEmbeddedData("kill_cnt", kill_cnt);

    // the simple trial-level data
    // NOTE that detailed trial-level data are not saved here, but it can be done.
    Qualtrics.SurveyEngine.setEmbeddedData("planned_trial", trial_seq);
    Qualtrics.SurveyEngine.setEmbeddedData("wasted_click_history", wasted_click_history.toString().replace(/,/g, ';'));

    /* Change 6: Saving the trial-level data and finishing up */
    // save the data
    Qualtrics.SurveyEngine.setEmbeddedData("trial_data", result_string);

    function sleep(time) {
        return new Promise((resolve) => setTimeout(resolve, time));
    }

    sleep(500).then(() => {
        saved_string = Qualtrics.SurveyEngine.getEmbeddedData("trial_data");
        //console.log(saved_string);
        if (result_string !== saved_string) {
            console.log('There was a problem with saving data. Trying again...')
            // try to save it once more, but no guarantee
            Qualtrics.SurveyEngine.setEmbeddedData("trial_data", result_string);
        } else {
            console.log('Save was successful.')
        }
    });

    sleep(500).then(() => {
        // clear the stage
        jQuery('#display_stage').remove();
        jQuery('#display_stage_background').remove();

        // simulate click on Qualtrics "next" button, making use of the Qualtrics JS API
        qthis.clickNextButton();
    });

}
});