Embedding the jsPsych Simple Reaction Time Task into Qualtrics
WARNING!! This tutorial series is based on version 6.x of jsPsych. Due to extensive changes in jsPsych 7.x and above, many things in this tutorial may not work with jsPsych v7.x and above. You can get jsPsych v6.3.1 (the last jsPsych 6.x release) from here. Here, I used v6.1.0, which is not much different from v6.3.1
Let's try to embed a more complicated task, the original jsPsych v6.3 Simple Reaction Time Task, to qualtrics. You can first try the task by clicking HERE.
The start: demo-simple-rt-task.html
The original experiment code, demo-simple-rt-task.html is here. Let's make the code work in a separate folder like the hello-world example.
To do so, you need to change the url of jsPsych scripts, stylesheet, and stimuli of the experiment code. In this tutorial, we will change those twice to make the rt-task (1) run on a new folder and (2) use the GitHub-hosted resources.
First, let's make it run locally. To do so, The jsPsych library, plugins, and stylesheet come from the local folder. As you can see, the demo-simple-rt-task.html in this repository looks at the local jspsych-6.1.0 folder for these files.
<script src="jspsych-6.1.0/jspsych.js"></script>
<script src="jspsych-6.1.0/plugins/jspsych-html-keyboard-response.js"></script>
<script src="jspsych-6.1.0/plugins/jspsych-image-keyboard-response.js"></script>
<link rel="stylesheet" href="jspsych-6.1.0/css/jspsych.css"></link>
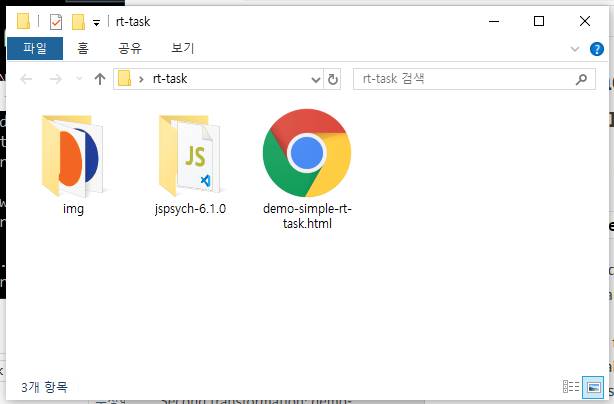
The experiment also needs stimuli images (see the original jsPsych v6.3 tutorial). So, you need to create a folder called img in the experiment folder and copy blue.png and orange.png into the img folder.
Your folder should look like this.
Hosting this task in GitHub
To use jsPsych in Qualtrics, the jsPsych javascript and CSS files need to be online and loadable from Qualtrics. Creating a GitHub repository for your experiment helps you do so in simple steps.
Step 0. Create a GitHub account
Go to the GitHub site and create your account.
Step 1. Create a new GitHub repository
First, create a repository for your experiment by following this Create a repo guide.
Step 2. Add experiment files to the repository
Upload your experiment files to the repository. The easy way is to drag and drop your files like this Adding a file to a repositoryguide. Do NOT forget to click the Commit changes button.
My Simple-RT-Task repository looks like this: https://github.com/kywch/Simple-RT-Task/.
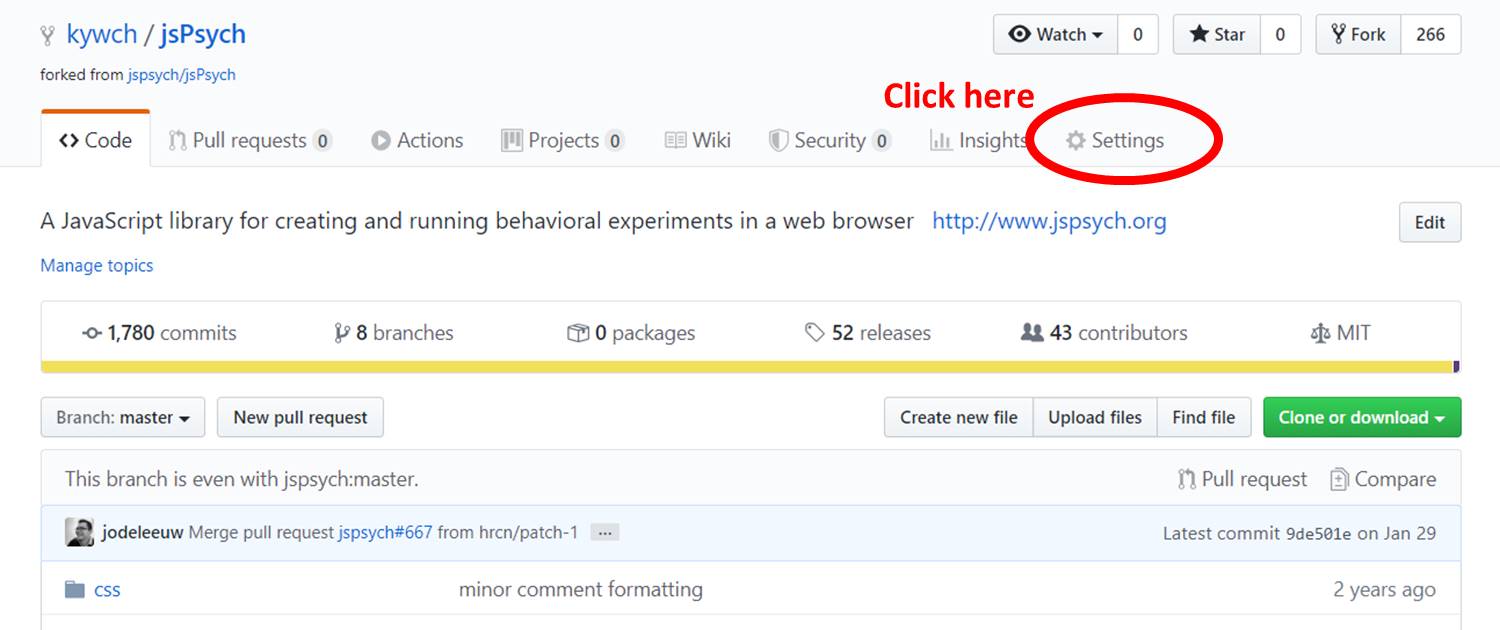
Step 3. Click the Settings button
Click the Settings button on the repository home page.
Step 4. Enable GitHub Pages for your experiment
Scroll down and find the GitHub Pages section. Select the Source to be the master branch.
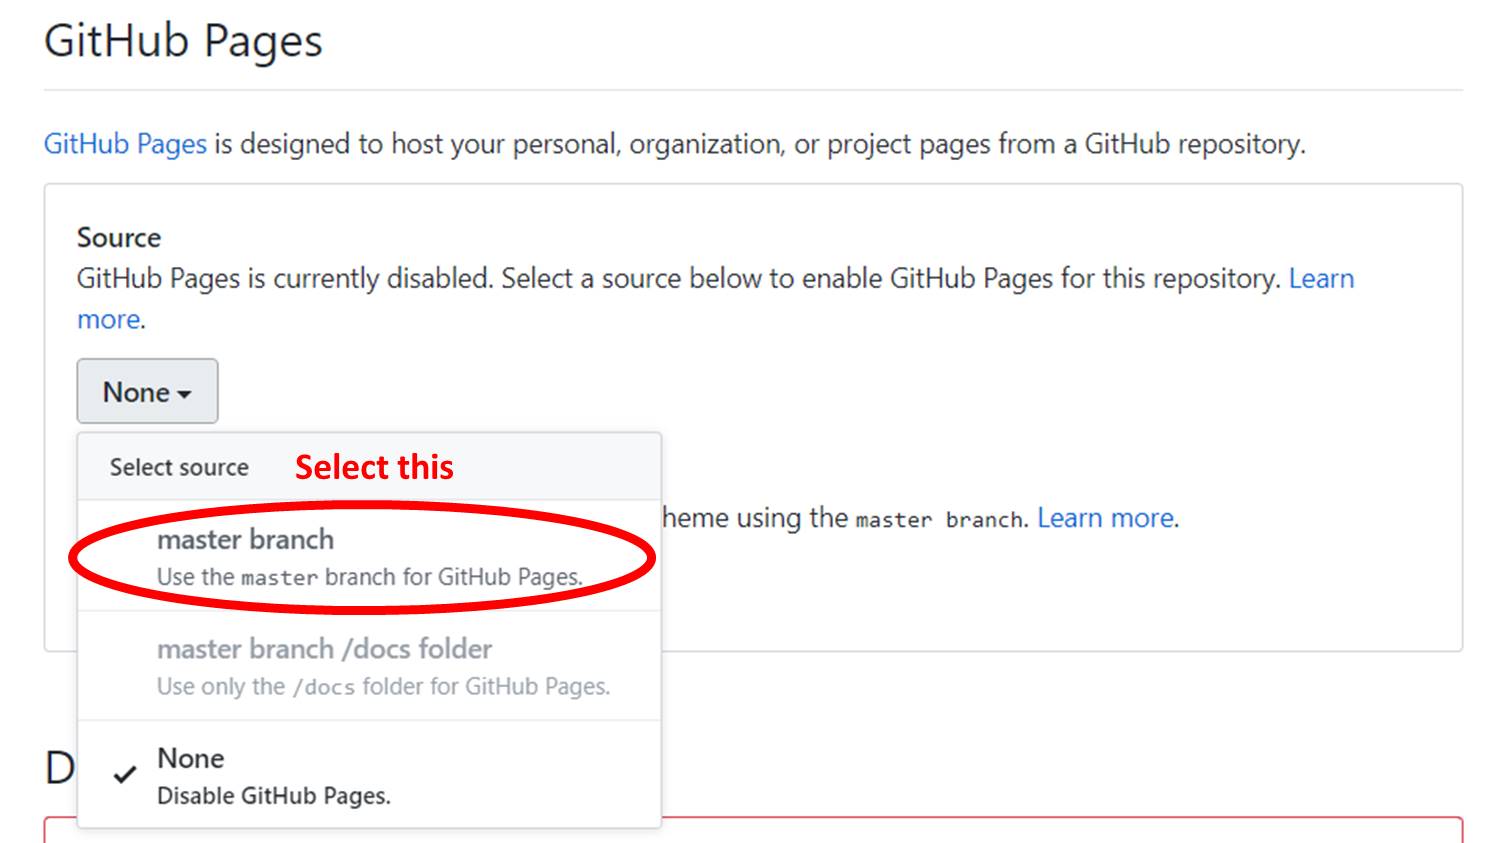
Within a few minutes, a website will be available at https://<your-github-username>.github.io/<your-experiment-name>/.
How do you know the page is up and running? Well, let's try to access the jspsych.css file by going into https://<your-github-username>.github.io/<your-experiment-name>/jspsych-6.1.0/css/jspsych.css. For example, https://kywch.github.io/Simple-RT-Task/jspsych-6.1.0/css/jspsych.css.
WAIT, did you know?
Did you know that you also accidentally made your task online that anyone with the Internet can try your task?
Open your browser and go to https://<your-github-username>.github.io/<your-experiment-name>/demo-simple-rt-task.html, or try mine: https://kywch.github.io/Simple-RT-Task/demo-simple-rt-task.html.
If your expeirment doesnt' work, (this may sound silly but worked for me) try to turn off and on the GitHub Pages multiple times (i.e., switching the Source to be None and master branch).
First transformation: demo-simple-rt-task-transformed.html and rt-task_main.js
I prefer to separate out the experiment-related code from the operation-related code, following the Experiment Factory style. If you haven't, please visit the Experiment Factory library, which contain a ton of experiments with running demos and their code.
In the demo-simple-rt-task.html, constructing the timeline can be considered to be experiment-related, and the remaining parts that also appear in the Hello-World example, such as loading jspsych.js and jsPsych.init() can be considered to be operation-related. Here, I am separating the experiment-related code and the operation-related code and putting the code into rt-task_main.js and demo-simple-rt-task-transformed.html, respectively, by following steps:
Step 1. Copy demo-simple-rt-task.html to demo-simple-rt-task-transformed.html
Step 2. Create a new file rt-task_main.js
And open rt-task_main.js in a new editor window.
Step 3. Cut and paste the experiment-related code
Open demo-simple-rt-task-transformed.html. You should have both rt-task_main.js and demo-simple-rt-task-transformed.html opened.
Select the code from the /* create timeline */ line to the timeline.push(debrief_block); line, cut the selection, and paste it to rt-task_main.js. REPEAT. The code is being cut-and-pasted (NOT copy-pasted).
/* create timeline */
var timeline = [];

/* define welcome message trial */
var welcome_block = {
    type: "html-keyboard-response",
    stimulus: "Welcome to the experiment. Press any key to begin."
};
timeline.push(welcome_block);

/* define instructions trial */
var instructions = {
    type: "html-keyboard-response",
    stimulus: "<p>In this experiment, a circle will appear in the center " +
        "of the screen.</p><p>If the circle is <strong>blue</strong>, " +
        "press the letter F on the keyboard as fast as you can.</p>" +
        "<p>If the circle is <strong>orange</strong>, press the letter J " +
        "as fast as you can.</p>" +
        "<div style='width: 700px;'>"+
        "<div style='float: left;'><img src='img/blue.png'></img>" +
        "<p class='small'><strong>Press the F key</strong></p></div>" +
        "<div class='float: right;'><img src='img/orange.png'></img>" +
        "<p class='small'><strong>Press the J key</strong></p></div>" +
        "</div>"+
        "<p>Press any key to begin.</p>",
    post_trial_gap: 2000
};
timeline.push(instructions);

/* test trials */

var test_stimuli = [
    { stimulus: "img/blue.png", data: { test_part: 'test', correct_response: 'f' } },
    { stimulus: "img/orange.png", data: { test_part: 'test', correct_response: 'j' } }
];

var fixation = {
    type: 'html-keyboard-response',
    stimulus: '<div style="font-size:60px;">+</div>',
    choices: jsPsych.NO_KEYS,
    trial_duration: function(){
    return jsPsych.randomization.sampleWithoutReplacement([250, 500, 750, 1000, 1250, 1500, 1750, 2000], 1)[0];
    },
    data: {test_part: 'fixation'}
}

var test = {
    type: "image-keyboard-response",
    stimulus: jsPsych.timelineVariable('stimulus'),
    choices: ['f', 'j'],
    data: jsPsych.timelineVariable('data'),
    on_finish: function(data){
    data.correct = data.key_press == jsPsych.pluginAPI.convertKeyCharacterToKeyCode(data.correct_response);
    },
}

var test_procedure = {
    timeline: [fixation, test],
    timeline_variables: test_stimuli,
    repetitions: 5,
    randomize_order: true
}
timeline.push(test_procedure);

/* define debrief */

var debrief_block = {
    type: "html-keyboard-response",
    stimulus: function() {

    var trials = jsPsych.data.get().filter({test_part: 'test'});
    var correct_trials = trials.filter({correct: true});
    var accuracy = Math.round(correct_trials.count() / trials.count() * 100);
    var rt = Math.round(correct_trials.select('rt').mean());

    return "<p>You responded correctly on "+accuracy+"% of the trials.</p>"+
    "<p>Your average response time was "+rt+"ms.</p>"+
    "<p>Press any key to complete the experiment. Thank you!</p>";

    }
};
timeline.push(debrief_block);
Step 4. rt-task_main.js: Use the GitHub-hosted stimuli images
The above code uses the stimuli images in the img folder placed with the experiment html. But since you also put these images in your GitHub repository and made these available through the Internet, you can also use these images.
The img/blue.png is available at https://<your-github-username>.github.io/<your-experiment-name>/img/blue.png. For example, https://kywch.github.io/Simple-RT-Task/img/blue.png.
And, the img/orange.png is available at https://<your-github-username>.github.io/<your-experiment-name>/img/orange.png. For example, https://kywch.github.io/Simple-RT-Task/img/orange.png.
The rt-task_main.js in this tutorial has a few changes to use the GitHub-hosted images. Let's see these changes.
Change 1: Adding the image hosting site
The repo_site variable was added to locate the site that hosts stimuli images. You can easily use your repository by changing this line.
// define the site that hosts stimuli images
// usually https://<your-github-username>.github.io/<your-experiment-name>/
var repo_site = "https://kywch.github.io/Simple-RT-Task/";
Change 2: Adding repo_site in instructions
The repo_site variable should be added to wherever img/blue.png and img/orange.png are used like the below. The find function really helps in doing so.
var instructions = {
    type: "html-keyboard-response",
    stimulus: "<p>In this experiment, a circle will appear in the center " +
        "of the screen.</p><p>If the circle is <strong>blue</strong>, " +
        "press the letter F on the keyboard as fast as you can.</p>" +
        "<p>If the circle is <strong>orange</strong>, press the letter J " +
        "as fast as you can.</p>" +
        "<div style='width: 700px;'>" +
        "<div style='float: left;'><img src='" + repo_site + "img/blue.png'></img>" + // Change 2: Adding `repo_site` in `instructions`
        "<p class='small'><strong>Press the F key</strong></p></div>" +
        "<div class='float: right;'><img src='" + repo_site + "img/orange.png'></img>" + // Change 2: Adding `repo_site` in `instructions`
        "<p class='small'><strong>Press the J key</strong></p></div>" +
        "</div>" +
        "<p>Press any key to begin.</p>",
    post_trial_gap: 2000
};
Change 3: Adding repo_site in test_stimuli
var test_stimuli = [{
        stimulus: repo_site + "img/blue.png", // Change 3: Adding `repo_site` in `test_stimuli`
        data: {
            test_part: 'test',
            correct_response: 'f'
        }
    },
    {
        stimulus: repo_site + "img/orange.png", // Change 3: Adding `repo_site` in `test_stimuli`
        data: {
            test_part: 'test',
            correct_response: 'j'
        }
    }
];
Step 5. demo-simple-rt-task-transformed.html: Import rt-task_main.js
Cutting the experiment-related code makes the demo-simple-rt-task-transformed.html file much shorter. To make demo-simple-rt-task-transformed.html work, you need to load rt-task_main.js by using a <script> tag like the other jspsych plugin files (see the original jsPsych v6.3 tutorial).
<!-- CHANGE: Loading the external main experiment script -->
<script src="rt-task_main.js"></script>
After making these changes, don't forget to SAVE!
Does this work?
Let's find out by opening demo-simple-rt-task-transformed.html in a browser.
Step 6: Upload demo-simple-rt-task-transformed.html and rt-task_main.js to GitHub
If this works, let's upload demo-simple-rt-task-transformed.html and rt-task_main.js to your GitHub repository so that your task also runs over the Internet.
After uploading both scripts (and waiting for a few minutes), you should be able to access https://<your-github-username>.github.io/<your-experiment-name>/demo-simple-rt-task-transformed.html. For example, https://kywch.github.io/Simple-RT-Task/demo-simple-rt-task-transformed.html.
If the above link works, then it also means that the experiment-related code, rt-task_main.js, is also available for Qualtrics to load. You can actually access it by going to https://<your-github-username>.github.io/<your-experiment-name>/rt-task_main.js. For example, https://kywch.github.io/Simple-RT-Task/rt-task_main.js.
Second transformation: demo-simple-rt-task-transformed-with-display-element.html
Adding the display_element parameter in the jsPsych.init() and having additional control over the display element is important for embedding jsPsych into Qualtrics. The demo-simple-rt-task-transformed-with-display-element.html file in this GitHub repository contains three changes from the demo-simple-rt-task-transformed.html. When you open demo-simple-rt-task-transformed-with-display-element.html in a browser, you should see the same reaction time task.
Let's look at each change.
Change 1: Using display_element
By adding the display_element parameter in the jsPsych.init() like below, jsPsych will render the experiment in the <div> called display_stage, which the current script does not have yet. So, let's add the display_stage.
/* start the experiment */
jsPsych.init({
timeline: timeline,
/* Change 1: Using `display_element` */
display_element: 'display_stage',
on_finish: function () {
    jsPsych.data.displayData();
}
});
Change 2: Adding display_stage CSS and Div
The display_stage needs below CSS and HTML code after the <body> tag, which also include the display_stage_background. Both are necessary to function well.
<style>
    #display_stage_background {
        width: 100vw;
        background-color: white;
        z-index: -1;
    }

    #display_stage {
        position: fixed;
        left: 1vw;
        top: 1vh;
        height: 98vh;
        width: 98vw;
        background-color: white;
        box-shadow: 1px 1px 1px #999;
        border-radius: 15px;
        z-index: 0;
        overflow-y: hidden;
        overflow-x: hidden;
    }
</style>

<div id='display_stage_background'></div>
<div id='display_stage'></div>
Change 3: Adding extra scripts for Qualtrics
The below scripts are not necessary to run this reaction time experiment, but you need to copy-paste these in Qualtrics later.
One critical point is that now we use the jsPsych stylesheet hosted in the GitHub Pages (explained above in the Hosting jsPsych section) instead of the CSS file in your computer. This is important because Qualtrics can also access the GitHub-hosted files.
<!-- Change 3: Adding extra scripts for Qualtrics -->
<!-- jspsych.css should be availble from your GitHub at
    https://<your-github-username>.github.io/<your-experiment-name>/jspsych-6.1.0/css/jspsych.css -->
<link href="https://kywch.github.io/Simple-RT-Task/jspsych-6.1.0/css/jspsych.css" rel="stylesheet" type="text/css"></link>

<div>
    <span style="font-size: 24px;">
    <br><br>
    If you are seeing this message for <span style="color: rgb(255, 0, 0);"><b>more than 5 minutes</b></span>,<br>
    please screen-capture this screen and send the image to us.
    <br><br>
    <span style="font-size: 28px;">We are very sorry for the inconvenience.</span>
    </span>
</div>
Third transformation: demo-simple-rt-task-qualtrics.js
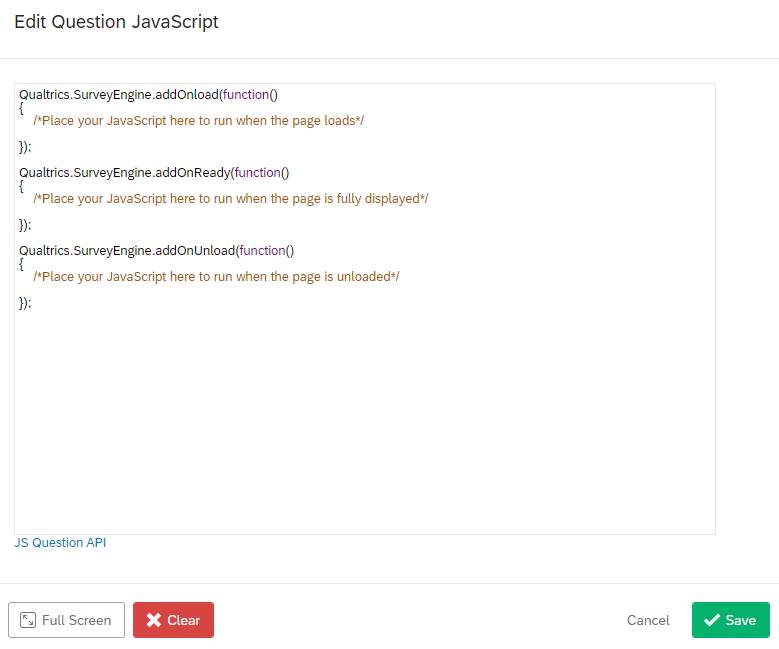
To make your jsPsych experiment work in Qualtrics, you need to add your code to the below skeleton provided by Qualtrics Question JavaScript Editor. For details, see the Add JavaScript help page.
Qualtrics.SurveyEngine.addOnload(function()
{
    /*Place your JavaScript here to run when the page loads*/

});

Qualtrics.SurveyEngine.addOnReady(function()
{
    /*Place your JavaScript here to run when the page is fully displayed*/

});

Qualtrics.SurveyEngine.addOnUnload(function()
{
    /*Place your JavaScript here to run when the page is unloaded*/

});
The demo-simple-rt-task-qualtrics.js file in this GitHub repository contains several changes from demo-simple-rt-task-transformed-with-display-element.html and can be direclty copy-pasted into the Qualtrics Question JavaScript Editor.
By separating the experiment-related code from the operation-related code, converting the html file to Qualtrics JavaScript function is pretty much similar to the Hello-World example.
Let's look at each change.
Change 1: Hiding the Next button
The below javascript code hides the Next button and puts the javascript code in the driving seat.
// Retrieve Qualtrics object and save in qthis
var qthis = this;

// Hide buttons
qthis.hideNextButton();
Change 2: Defining and load required resources
The below javascript defines where the necessary files are so that Qualtrics can load these. If you enabled GitHub Pages of your repository, Qualtrics can load the necessary JS, CSS, and image files right away.
One way to check whether these files are accessilbe is to view the source of demo-simple-rt-task-transformed.html and click the imported scripts. For example of jspsych.js, https://your-github-username.github.io/your-experiment-name/jspsych-6.1.0/jspsych.js.
var task_github = "https://kywch.github.io/Simple-RT-Task/"; // https://<your-github-username>.github.io/<your-experiment-name>

// requiredResources must include all the JS files that demo-simple-rt-task-transformed.html uses.
var requiredResources = [
    task_github + "jspsych-6.1.0/jspsych.js",
    task_github + "jspsych-6.1.0/plugins/jspsych-html-keyboard-response.js",
    task_github + "jspsych-6.1.0/plugins/jspsych-image-keyboard-response.js",
    task_github + "rt-task_main.js"
];

function loadScript(idx) {
    console.log("Loading ", requiredResources[idx]);
    jQuery.getScript(requiredResources[idx], function () {
        if ((idx + 1) < requiredResources.length) {
            loadScript(idx + 1);
        } else {
            initExp();
        }
    });
}

if (window.Qualtrics && (!window.frameElement || window.frameElement.id !== "mobile-preview-view")) {
    loadScript(0);
}
Change 3: Appending the display_stage Div using jQuery
In Qualtrics, jQuery (loaded by default) is used to append the display_stage_background and display_stage Divs. The CSS for these elements will be added directly to Question HTML later in this tutorial.
// jQuery is loaded in Qualtrics by default
jQuery("<div id = 'display_stage_background'></div>").appendTo('body');
jQuery("<div id = 'display_stage'></div>").appendTo('body');
Change 4: Wrapping jsPsych.init() in a function
The main experiment codes are wrapped in the initExp function to make sure it runs after all the necessary library and plugin files are loaded (as defined in the loadScript function above).
Change 5: Summarizing and save the results to Qualtrics
The original jsPsych v6.3 tutorial shows you how you can process and summarize the experiment results online. Wouldn't it be great if your experiment results are directly included in your Qualtrics data?
Well, you can actually summarize the results online and save those results in Qualtrics' Embedded Data using the setEmbeddedData function.
demo-simple-rt-task-qualtrics.js does so when the jsPsych experiment finishes by running the below code (from debrief_block).
jsPsych.init({
    timeline: timeline,
    display_element: 'display_stage',
    on_finish: function (data) {
        /* Change 5: Summarizing and save the results to Qualtrics */
        // summarize the results
        var trials = jsPsych.data.get().filter({
            test_part: 'test'
        });
        var correct_trials = trials.filter({
            correct: true
        });
        var accuracy = Math.round(correct_trials.count() / trials.count() * 100);
        var rt = Math.round(correct_trials.select('rt').mean());

        // save to qualtrics embedded data
        Qualtrics.SurveyEngine.setEmbeddedData("accuracy", accuracy);
        Qualtrics.SurveyEngine.setEmbeddedData("rt", rt);

        /* Change 6: Adding the clean up and continue functions.*/
        // clear the stage
        jQuery('#display_stage').remove();
        jQuery('#display_stage_background').remove();

        // simulate click on Qualtrics "next" button, making use of the Qualtrics JS API
        qthis.clickNextButton();
    }
});
Change 6: Adding the clean up and continue functions
When the jsPsych ends, display_stage and display_stage_background should be removed. Then, execulte the clickNextButton to simulate clicking the Next button and proceed to the next question.
Finally, embedding jsPsych in Qualtrics
Let's log in to Qualtrics and take a look at each step.
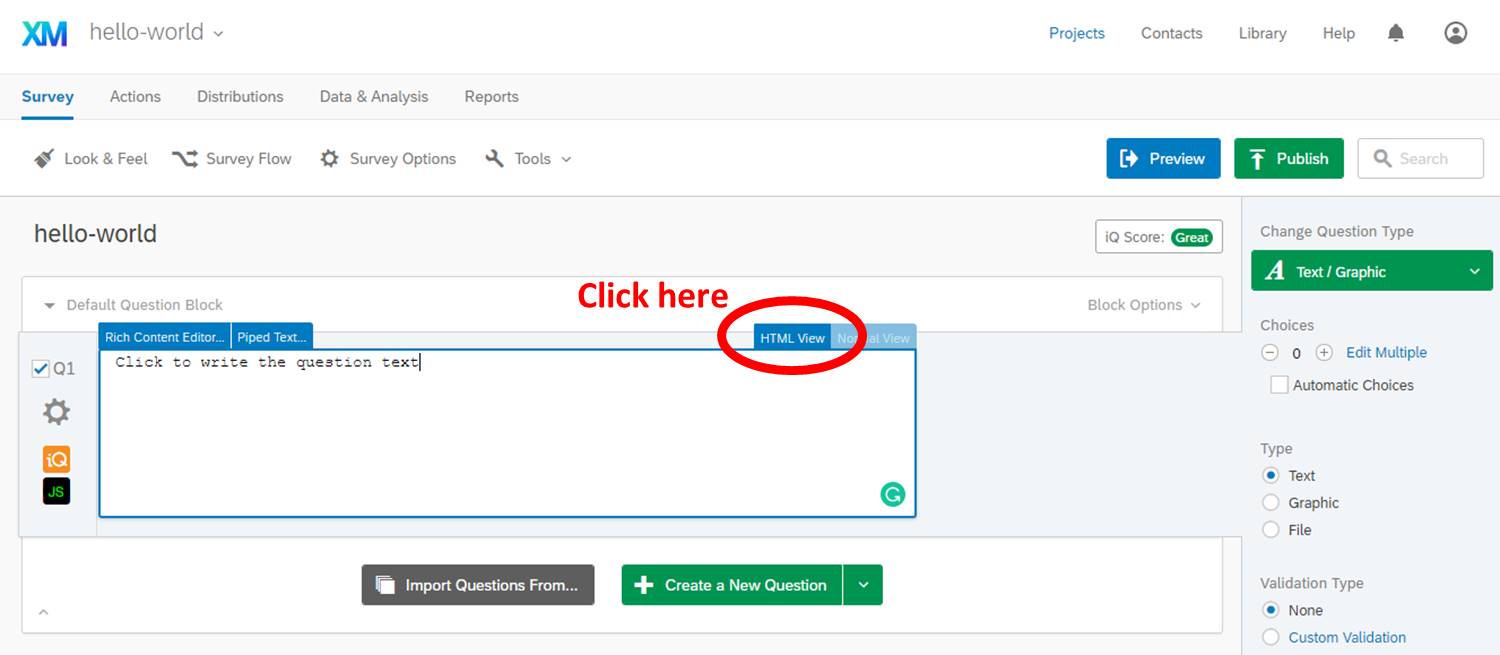
Step 1. Create a new Qualtrics project and then a new question
Create a new Qualtrics project. Then, create a new question and (1) change its format to Text/Graphic.
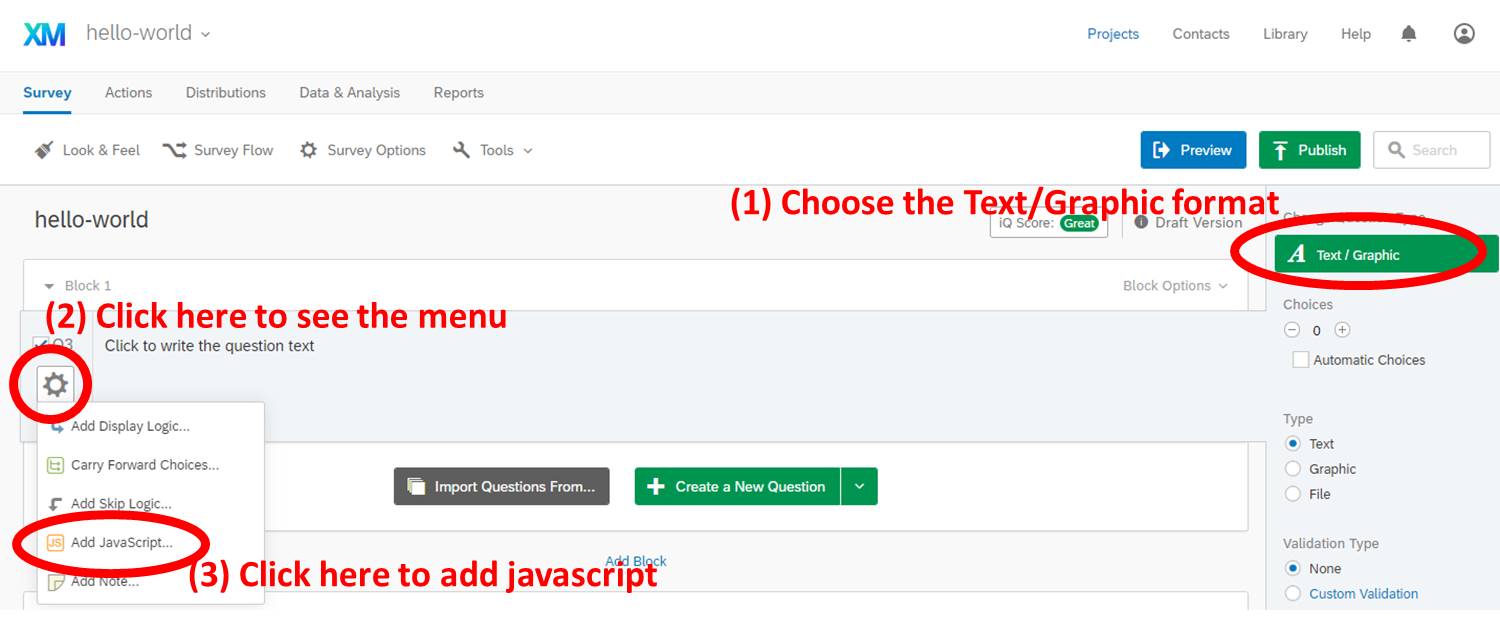
Step 2. Open the Question JavaScript editor and copy paste the whole demo-simple-rt-task-qualtrics.js
Keep going in the above picture. (2) Click the gear to open the dropdown menu, and then (3) find and click Add JavaScript.
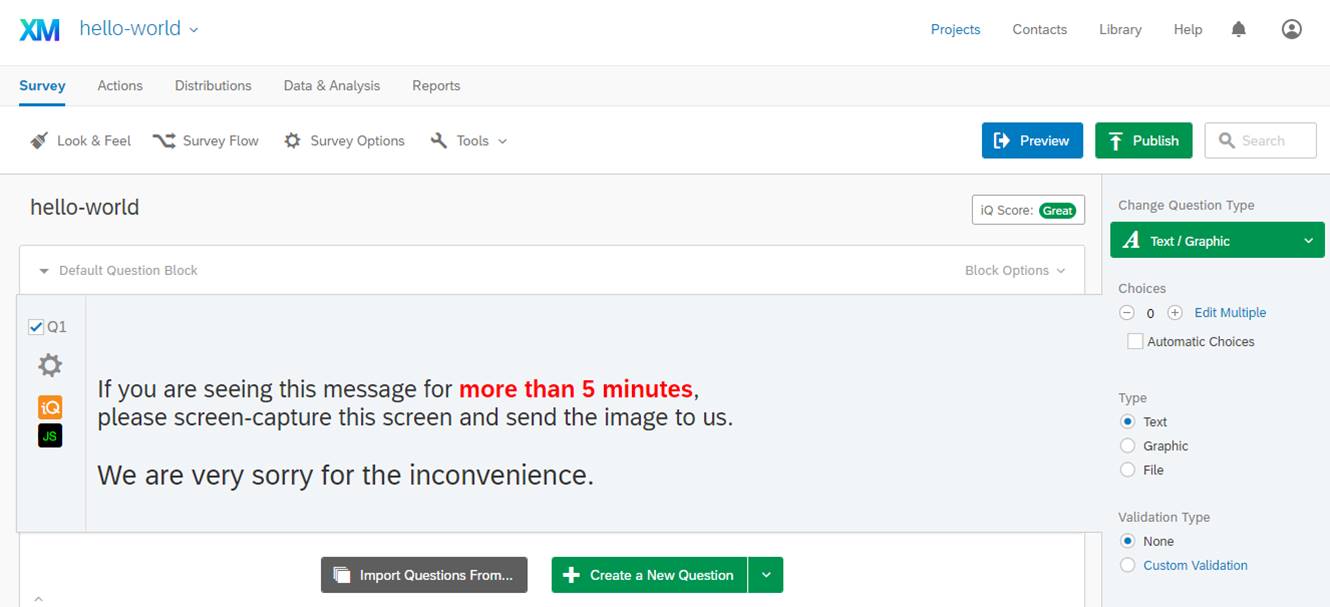
Step 3. Open the Question HTML editor and copy paste the portion of demo-simple-rt-task-transformed-with-display-element.html
The Change 3 section of the demo-simple-rt-task-transformed-with-display-element.html file contains the link to jsPsych CSS file, the inline styles for display_stage Div, and the error message to be displayed when things go wrong.
To open the HTML editor, click the HTML View button.
Then, copy paste the portion of demo-simple-rt-task-transformed-with-display-element.html to the HTML editor, starting from <!-- COPY PASTE TO QUALTRICS FROM HERE --> to <!-- COPY PASTE TO QUALTRICS UP TO HERE -->.
<!-- Change 3: Adding extra scripts for Qualtrics -->
<!-- COPY PASTE TO QUALTRICS FROM HERE -->
<link href="https://kywch.github.io/Simple-RT-Task/jspsych-6.1.0/css/jspsych.css" rel="stylesheet" type="text/css"></link>

<div>
<span style="font-size: 24px;">
    <br><br>
    If you are seeing this message for <span style="color: rgb(255, 0, 0);"><b>more than 5
        minutes</b></span>,<br>
    please screen-capture this screen and send the image to us.
    <br><br>
    <span style="font-size: 28px;">We are very sorry for the inconvenience.</span>
</span>
</div>

<!-- Change 2: Adding `display_stage` CSS and Div -->
<style>
#display_stage_background {
    width: 100vw;
    background-color: white;
    z-index: -1;
}

#display_stage {
    position: fixed;
    left: 1vw;
    top: 1vh;
    height: 98vh;
    width: 98vw;
    background-color: white;
    box-shadow: 1px 1px 1px #999;
    border-radius: 15px;
    z-index: 0;
    overflow-y: hidden;
    overflow-x: hidden;
}
</style>
<!-- COPY PASTE TO QUALTRICS UP TO HERE -->
After copy pasting, you should see something like below.
Step 4. Create Embedded Data elements
To store the experiment results -- accuracy and rt -- in Qualtrics, you need to create the Embedded Data elements named accuracy and rt in your survey by following this Qualtrics tutorial.
- Click Survey Flow from the Survey tab
- Click Add a New Element Here
- Choose Embedded Data
- Click Create New Field or Choose From Dropdown and type accuracy
- Click Set a Value Now and type -1
- Click Add a New Field and type rt
- Click Set a Value Now and type -1
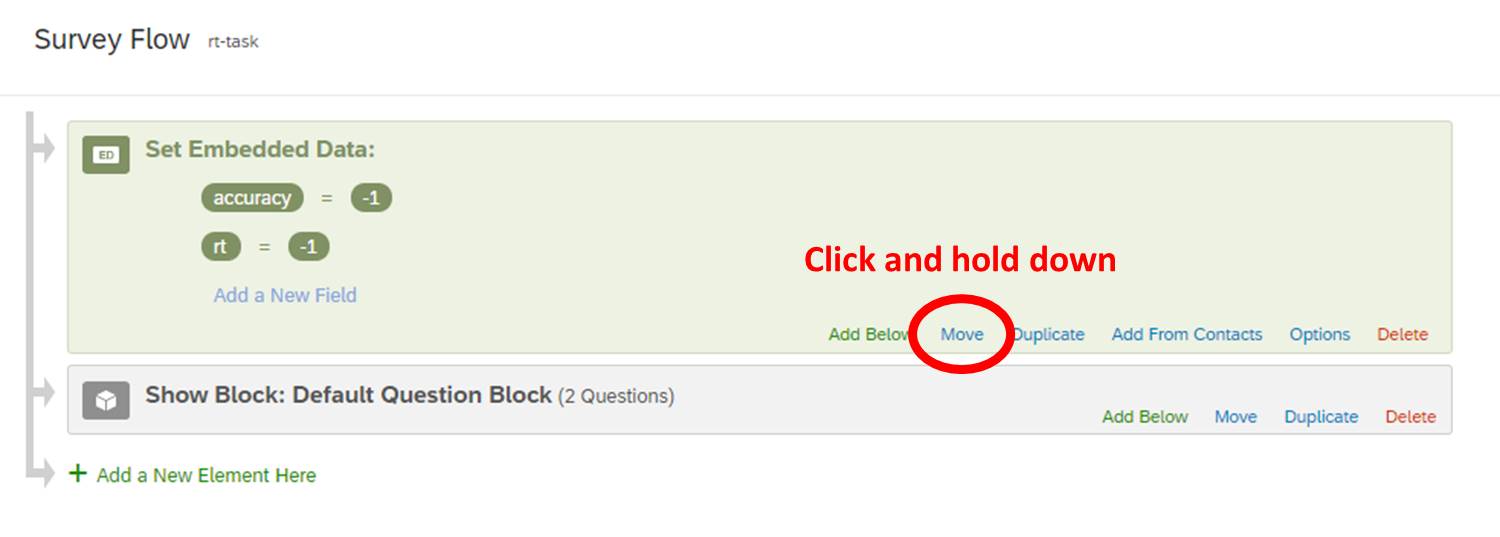
Step 5. Move Set Embedded Data block to the top of Survey Flow
The accuracy and rt fields should be defined before the jsPsych reaction time task, so you need to move the Embedded Data block to the top of the Survey Flow.
Click and hold down Move to drag the Embedded Data to the top of the Survey Flow. After this, you should see the Survey Flow like below.
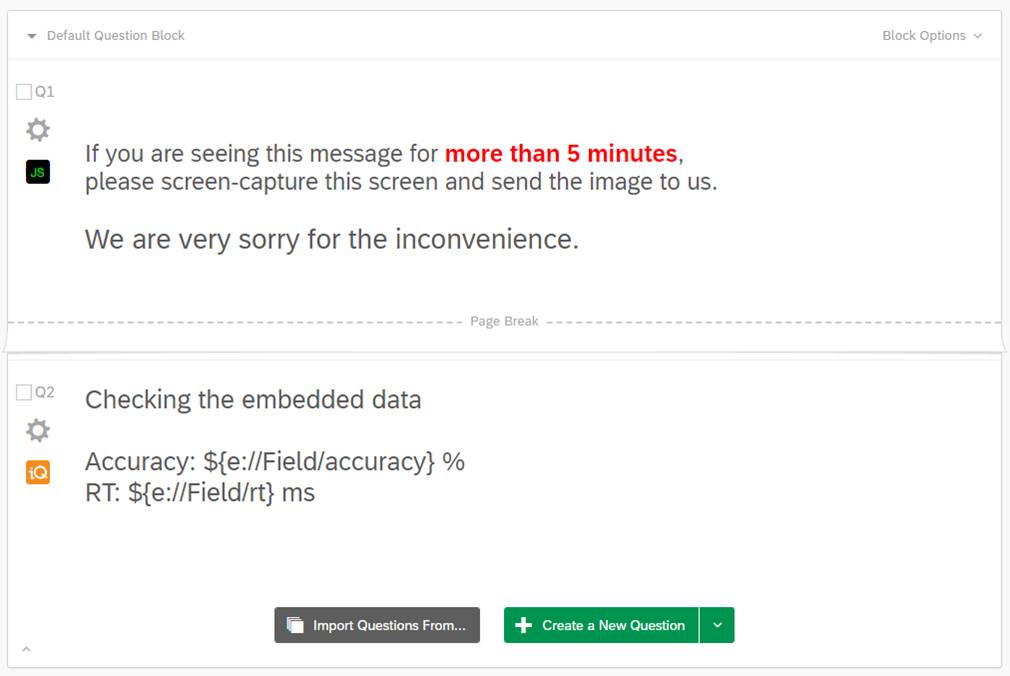
Step 6. Add a check for the Embedded Data
You should make sure that the experiment results are saved correctly. You can do so by showing the accuracy and rt Embedded Data after the reaction task.
- Click Add Page Break
- Click Create a New Question
- Change Question Type to Text/Graphic
- Type
${e://Field/accuracy}and${e://Field/rt}to access these Embedded Data
Step 7. Publish and test!
Publish the survey by following this Qualtrics tutorial. Then, an anonymous Qualtrics link is generated. If you click this link, you should be able to see the same reaction time task running in Qualtrics. For example, try this Qualtrics link.
Do you want to save the trial-by-trial data?
Then, you need a server that can receive your data. See the tutorial Saving data to a web server using PHP.